Best Way to Grow Aloe Vera Indoors: Tips for Healthy Growth
Aloe Vera is more than just a striking indoor plant; it’s a powerhouse of health benefits, known for its soothing gel and air-purifying properties. Whether you’re an experienced plant parent or a novice looking to add some greenery to your space, growing Aloe Vera indoors can be a rewarding experience. However, many people encounter challenges that hinder the plant’s growth and vitality.
Aloe Vera plants thrive when given the right care. Unfortunately, without proper attention, they can quickly succumb to issues like overwatering, insufficient light, or poor soil conditions. This guide is designed to help you navigate the essential practices for cultivating a healthy Aloe Vera indoors, ensuring that you can enjoy its beauty and benefits for years to come.
In this article, we’ll explore the best ways to grow Aloe Vera indoors, providing you with practical tips on light requirements, watering routines, soil selection, and troubleshooting common issues. By following these guidelines, you’ll not only foster a flourishing plant but also enhance your indoor environment with this remarkable succulent.
Understanding Aloe Vera
Characteristics of Aloe Vera
Aloe Vera (Aloe barbadensis miller) is a perennial succulent with thick, fleshy leaves that contain a gel-like substance. This gel is famous for its soothing properties, especially for skin irritations, burns, and hydration. Aloe Vera plants can grow up to 3 feet tall and produce tall flower spikes with tubular yellow or orange flowers when mature.
Health Benefits
Aloe Vera is well-known for its numerous health benefits, including:
- Skin Healing: The gel is often used topically to treat burns, cuts, and skin irritations.
- Hydration: Aloe Vera juice is a popular drink for its hydrating and detoxifying properties.
- Air Purification: Studies suggest that Aloe Vera can improve indoor air quality by removing toxins.
Common Varieties
While the most popular type is the standard Aloe Vera, there are several other varieties, such as:
- Aloe Vera ‘Miller’: This is the classic variety with broad, fleshy leaves.
- Aloe ‘Snowstorm’: Known for its white speckles, this variety has a striking appearance.
- Aloe ‘Black Gem’: This smaller variety features dark green leaves with a beautiful rosette shape.
Choosing the Right Pot and Soil
Pot Selection
Choosing the right pot for your Aloe Vera is crucial for its health. Here are some factors to consider:
- Material: Opt for terracotta or ceramic pots as they allow for better airflow and drainage. Plastic pots can retain moisture, which may lead to root rot.
- Size: Select a pot that is slightly larger than the plant’s current pot. Aloe Vera prefers to be somewhat root-bound, so avoid oversized pots that retain excess moisture.
Soil Requirements
Aloe Vera thrives in well-draining soil. Here’s how to choose the right mix:
- Cactus/Succulent Mix: Use a commercial cactus or succulent mix, which contains a blend of potting soil, sand, and perlite.
- DIY Soil Mix: If you prefer to create your own mix, combine one part potting soil, one part coarse sand, and one part perlite. This mixture ensures proper drainage and prevents root rot.
Light Requirements
Aloe Vera loves bright, indirect light but can also tolerate direct sunlight. Here’s what you need to know:
- Optimal Light Conditions: Aim for 6 to 8 hours of bright, indirect sunlight daily. A south-facing window is ideal.
- Signs of Too Much Light: If you notice the leaves turning brown or crispy, your plant may be getting too much direct sunlight. Move it to a location with filtered light.
- Signs of Insufficient Light: If the leaves are stretching or becoming leggy, it’s a sign that your Aloe Vera needs more light. Consider supplementing with a grow light during the winter months.
Watering Techniques
Watering is one of the most critical aspects of Aloe Vera care. Here’s how to do it correctly:
- When to Water: Allow the top 2 inches of soil to dry out completely before watering again. This usually means watering every 2 to 3 weeks, depending on your indoor climate.
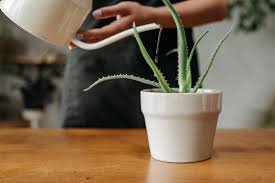
- Proper Watering Method: Water deeply until you see water draining from the bottom of the pot. Ensure that the pot has drainage holes to prevent water from sitting at the bottom.
- Avoiding Common Mistakes: Overwatering is a common mistake. If you notice yellowing leaves or a mushy texture, it’s likely due to overwatering. Underwatering is also a concern; if the leaves are shriveling or curling, increase your watering frequency.
Temperature and Humidity Preferences
Ideal Temperature
Aloe Vera prefers temperatures between 60°F to 75°F (15°C to 24°C). Here’s how to maintain the right environment:
- Avoid Extremes: Keep your plant away from drafts, heaters, and air conditioning vents, as extreme temperature fluctuations can stress the plant.
- Winter Care: In colder months, keep your Aloe Vera indoors to protect it from frost.
Humidity Levels
Aloe Vera is a drought-tolerant plant that thrives in low humidity. Here are some tips for maintaining the right humidity levels:
- Average Indoor Humidity: Normal household humidity is usually sufficient for Aloe Vera. Avoid placing it in overly humid areas, like bathrooms.
- Increasing Humidity: If your home is exceptionally dry, consider placing a small humidifier nearby or grouping your plants together to create a more humid microclimate.
Fertilizing Aloe Vera
When and How to Fertilize
Aloe Vera doesn’t require heavy feeding, but occasional fertilization can support healthy growth:
- Frequency: Fertilize during the growing season (spring and summer) every 4 to 6 weeks.
- Fertilizer Type: Use a balanced, diluted liquid fertilizer or a slow-release fertilizer formulated for succulents. Avoid high-nitrogen fertilizers, as they can promote leaf growth at the expense of the plant’s overall health.
Signs of Nutrient Deficiency
Watch for signs that your Aloe Vera may need fertilization:
- Pale or Yellowing Leaves: This can indicate a lack of essential nutrients.
- Stunted Growth: If your plant isn’t growing as expected, it may benefit from a nutrient boost.
Pest and Disease Management
Common Pests
While Aloe Vera is generally pest-resistant, it can still fall victim to a few common pests:
- Mealybugs: These small, white, cottony pests can infest the leaves. Treat them with insecticidal soap or neem oil.
- Aphids: Tiny, green pests that can cluster on the new growth. Remove them with a strong water spray or use insecticidal soap.
Signs of Pest Infestations
- Sticky Leaves: A sign of aphids or mealybugs; check for pest presence.
- Webbing: Spider mites can leave fine webs on the leaves. Increase humidity and treat with insecticidal soap.
Common Diseases
Aloe Vera is susceptible to certain diseases, often linked to improper care:
- Root Rot: Caused by overwatering, leading to blackened, mushy roots. Allow the soil to dry out and repot in fresh, dry soil if root rot occurs.
- Leaf Spot: Dark spots on leaves can indicate fungal infections. Improve airflow and avoid overhead watering.

Propagation Techniques
How to Propagate Aloe Vera
Aloe Vera is easy to propagate, making it an excellent plant for sharing with friends. Here’s how:
- Offsets (Pups): Aloe Vera produces offsets, or pups, at the base of the plant. Wait until they’re at least a few inches tall, then gently separate them from the mother plant. Allow the cut end to callus for a day before planting in fresh soil.
- Leaf Cuttings: While less common, you can also propagate Aloe Vera from leaf cuttings. Cut a healthy leaf, let it callus for a day, then plant it in well-draining soil. Water sparingly until roots develop.
Caring for Newly Propagated Plants
Newly propagated Aloe Vera needs special attention:
- Watering: Water lightly after planting, allowing the soil to dry out between waterings.
- Light Conditions: Keep the new plant in bright, indirect light until it establishes roots.
Troubleshooting Common Issues
Yellowing Leaves
Causes:
- Overwatering or poor drainage.
- Nutrient deficiencies.
Solutions:
- Check soil moisture and adjust watering frequency.
- Consider fertilizing if it’s been a while since the last feeding.
Browning Leaf Tips
Causes:
- Underwatering or too much direct sunlight.
Solutions:
- Adjust your watering schedule and move the plant to a location with indirect light.
Drooping Leaves
Causes:
- Underwatering, root-bound conditions, or temperature stress.
Solutions:
- Assess your plant’s watering needs, and if it’s root-bound, consider repotting into a larger container.
Frequently Asked Questions (FAQs)
Q: Can Aloe Vera grow in low light?
A: Aloe Vera can tolerate low light, but growth will be stunted, and leaves may not develop their characteristic thickness. Aim for bright, indirect light for optimal growth.
Q: How often should I water my Aloe Vera?
A: Water every 2 to 3 weeks, allowing the top 2 inches of soil to dry out completely between waterings.
Q: Is Aloe Vera safe for pets?
A: Aloe Vera is toxic to pets if ingested. Keep it out of reach of cats and dogs.
Q: How do I make my Aloe Vera grow faster?
A: Provide bright, indirect light, regular feeding during the growing season, and proper watering. Consider propagating offsets to increase your plant collection.
Q: Why are my Aloe Vera leaves curling?
A: Curling leaves may indicate underwatering. Check soil moisture and adjust your watering routine.
Short Summary
Growing Aloe Vera indoors can be a fulfilling and beneficial hobby. By following these comprehensive tips and best practices, you’ll be well on your way to nurturing a healthy, thriving Aloe Vera plant. With proper care, your Aloe Vera will not only enhance your indoor space but also provide natural remedies for a variety of health concerns. Remember to keep experimenting and learning about this remarkable plant, and enjoy the journey of indoor gardening!


