Best Way to Care Spider Plants Indoors
Spider plants (Chlorophytum comosum) are a popular indoor plant, known for their air-purifying qualities, resilience, and beautiful arching green leaves with white stripes. They’re perfect for both beginner and seasoned plant enthusiasts, thriving in a variety of indoor environments with minimal care. This blog will walk you through everything you need to know about caring for spider plants indoors, from choosing the right environment to understanding their watering, feeding, and propagation needs.
Whether you’re a first-time plant parent or looking to perfect your spider plant care, this guide will ensure your spider plants stay healthy and vibrant.
Why Spider Plants Are a Great Choice for Indoor Gardens
Before diving into the specifics of care, let’s talk about why spider plants are a great option for your indoor garden. Here are a few reasons:
- Air-Purifying Qualities: Spider plants have been recognized by NASA for their ability to improve air quality by absorbing pollutants like formaldehyde and carbon monoxide.
- Pet-Friendly: Spider plants are non-toxic to pets, making them safe for homes with cats and dogs.
- Easy to Care For: Spider plants are incredibly forgiving and adapt well to various lighting conditions, making them ideal for beginners.
- Aesthetic Appeal: The cascading green and white foliage of spider plants adds a touch of elegance and life to any room.
1. Ideal Growing Environment for Spider Plants
Creating the right environment for your spider plant indoors is the first step in ensuring its long-term health.
Light Requirements
Spider plants thrive in bright, indirect light but can tolerate lower light conditions, making them versatile for different indoor spaces. Here’s how to provide the best light for your plant:
- Bright, Indirect Light: Spider plants grow best when placed near a window with filtered light. If placed in too much direct sunlight, their leaves can get scorched.
- Low-Light Tolerance: Spider plants can survive in low-light conditions but may grow slower and produce less vibrant leaves. This makes them great for rooms without much natural light.
- Avoid Harsh Sun: Too much direct sunlight, especially through a hot window, can lead to brown tips on the leaves.
If you don’t have much natural light, consider placing your spider plant under a fluorescent or LED grow light to keep it thriving.
Temperature and Humidity
Spider plants prefer temperatures between 55°F and 80°F (13°C – 27°C), which makes them suitable for most indoor settings. However, they don’t like sudden temperature drops or cold drafts.
- Keep Away from Drafts: Avoid placing your spider plant near doors, windows, or air vents where cold air might hit it.
- Humidity Levels: Spider plants do well in normal household humidity but will appreciate occasional misting if your home has very dry air, especially during the winter months when indoor heating can reduce humidity.
Soil and Potting
Spider plants prefer well-draining soil, and they’re not too picky about the type of soil as long as it doesn’t retain too much moisture. Here’s what you should consider:
- Use a Light Potting Mix: A standard indoor potting mix works great for spider plants, but you can also mix in some perlite or sand to improve drainage.
- Choose the Right Pot: Ensure the pot has drainage holes to prevent water from pooling at the bottom, which can lead to root rot. A plastic or ceramic pot with proper drainage is ideal.
2. Watering Spider Plants
Watering is often the trickiest part of caring for houseplants, but spider plants are relatively easy-going. However, they do have some specific watering needs.
How Often to Water
Spider plants like consistently moist (but not waterlogged) soil. Here’s a general guideline for how often you should water your plant:
- Water When Topsoil is Dry: Water your spider plant when the top inch of soil feels dry to the touch. This usually means watering once a week, though the frequency will vary depending on the season and the environment.
- Adjust for Season: During the growing season (spring and summer), your spider plant will need more water. In fall and winter, you can cut back on watering as the plant’s growth slows.
Avoiding Overwatering
Overwatering is the most common mistake people make when caring for spider plants. Signs of overwatering include yellowing leaves, root rot, and brown leaf tips. To avoid this:
- Check the Soil First: Always check the soil before watering. Stick your finger into the soil to check for moisture—if it’s still damp, wait a few more days before watering.
- Proper Drainage: Ensure the pot has proper drainage holes to prevent water from accumulating at the bottom.
Using the Right Water
Spider plants are sensitive to the chemicals often found in tap water, such as chlorine and fluoride. These chemicals can cause the tips of the leaves to turn brown. Here’s how to avoid this problem:
- Use Filtered or Distilled Water: If your tap water has high chlorine or fluoride content, consider using filtered or distilled water to keep your spider plant happy.
- Let Tap Water Sit: Alternatively, you can leave tap water out for 24 hours before watering your plant to allow the chemicals to dissipate.
3. Fertilizing Spider Plants
Spider plants don’t need heavy feeding but will appreciate a little fertilizer during their active growing season to stay lush and green.
How Often to Fertilize
- Spring and Summer: Feed your spider plant every 4-6 weeks during the growing season (spring and summer) with a balanced, water-soluble houseplant fertilizer. Dilute the fertilizer to half strength to avoid overfeeding.
- Fall and Winter: During the fall and winter months, you can stop fertilizing as the plant’s growth slows.
Over-fertilizing can lead to salt buildup in the soil, which may cause brown leaf tips. If you notice this happening, flush the soil with clean water to remove excess salts.
4. Pruning and Repotting Spider Plants
Spider plants are fast growers, and their arching leaves can get quite long, so occasional pruning and repotting will keep them healthy and looking their best.
Pruning
Regular pruning can help your spider plant maintain a tidy appearance and encourage new growth. Here’s how:
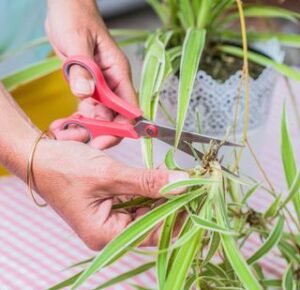
- Trim Brown Tips: Brown leaf tips are common on spider plants and can be caused by overwatering, chemical buildup, or low humidity. Simply snip off the brown tips with clean, sharp scissors.
- Remove Dead Leaves: Remove any dead or yellowing leaves by cutting them off at the base to encourage healthy new growth.
Repotting
Spider plants grow quickly, and their roots can become crowded, leading to slower growth and stress. Repot your plant every 1-2 years, or when you notice the roots growing out of the drainage holes.
- Choose a Pot One Size Larger: When repotting, choose a pot that’s about one size larger than the current one to give the roots room to grow.
- Fresh Soil: Use fresh potting mix when repotting to give the plant access to new nutrients.

5. Spider Plant Propagation
One of the joys of caring for spider plants is how easy they are to propagate. Spider plants produce baby plants, known as “spiderettes” or “pups,” which can be propagated into new plants.
How to Propagate Spiderettes
- Wait for Spiderettes: Spider plants naturally produce small plantlets, which hang from the mother plant on long stems.
- Cut and Plant: Once the spiderettes have roots that are about 1-2 inches long, you can cut them from the mother plant and plant them directly into a small pot with fresh potting soil.
- Water and Care: Water the new plant lightly, and place it in a spot with bright, indirect light. Over time, the spiderette will grow into a full-sized plant.
You can also propagate spiderettes by placing them in water until their roots grow longer and stronger, then transferring them to soil.
6. Common Problems and Solutions
Despite being relatively low-maintenance, spider plants can occasionally face some issues. Here’s how to handle the most common problems:
Brown Leaf Tips
As mentioned earlier, brown tips are often caused by overwatering, low humidity, or chemicals in tap water.
- Solution: Adjust your watering schedule, increase humidity, or switch to distilled water to prevent this issue.
Yellowing Leaves
Yellowing leaves can indicate overwatering or poor drainage. If your plant’s leaves start turning yellow:
- Solution: Check the soil to ensure it’s not waterlogged, and consider repotting into a better-draining mix if necessary.
Root Rot
Root rot occurs when the plant’s roots sit in water for too long, causing them to decay. Symptoms include mushy roots and wilting leaves.
- Solution: Repot the plant into fresh, dry soil and cut away any damaged roots.
Short Summary
Caring for spider plants indoors is a rewarding experience, thanks to their easy-going nature, air-purifying qualities, and beauty. By providing the right light, water, and occasional fertilizer, you can enjoy a healthy and thriving spider plant for years. Plus, with their easy propagation, you can quickly fill your home with even more greenery or share the joy of spider plants with friends and family.
By following these tips, your spider plant will not only survive but thrive, adding a touch of natural beauty to your indoor space. Happy growing!


